Styles and Formatting
Not every document is the same. Here’s a guide on how to change the styles and formatting of your document to make your document different. Not weird. Just different.
Your branding is important for your company. Everything, from the colour palette to your font choice, gives an idea of who your company is just as much as the copy. Proposify makes it easy for you to add a branded touch to your document’s copy within a few clicks.
To access the type styles menu, select Edit Styles and Formatting at the top of your Proposal or Template Editor:

This pulls up your type styles menu. We'll put away all your other content. This way, you can focus on the copy you’re changing and how it looks compared to everything else.
WHY ISN’T THIS IN THE SECTION EDITOR?
Since sections inherit the style and formatting of the document they’re being imported to, we don’t include this button. While working in the Section Editor, the formatting will come from your default template.
Type Styles
The Type Styles menu is your focused typography formatting tool.
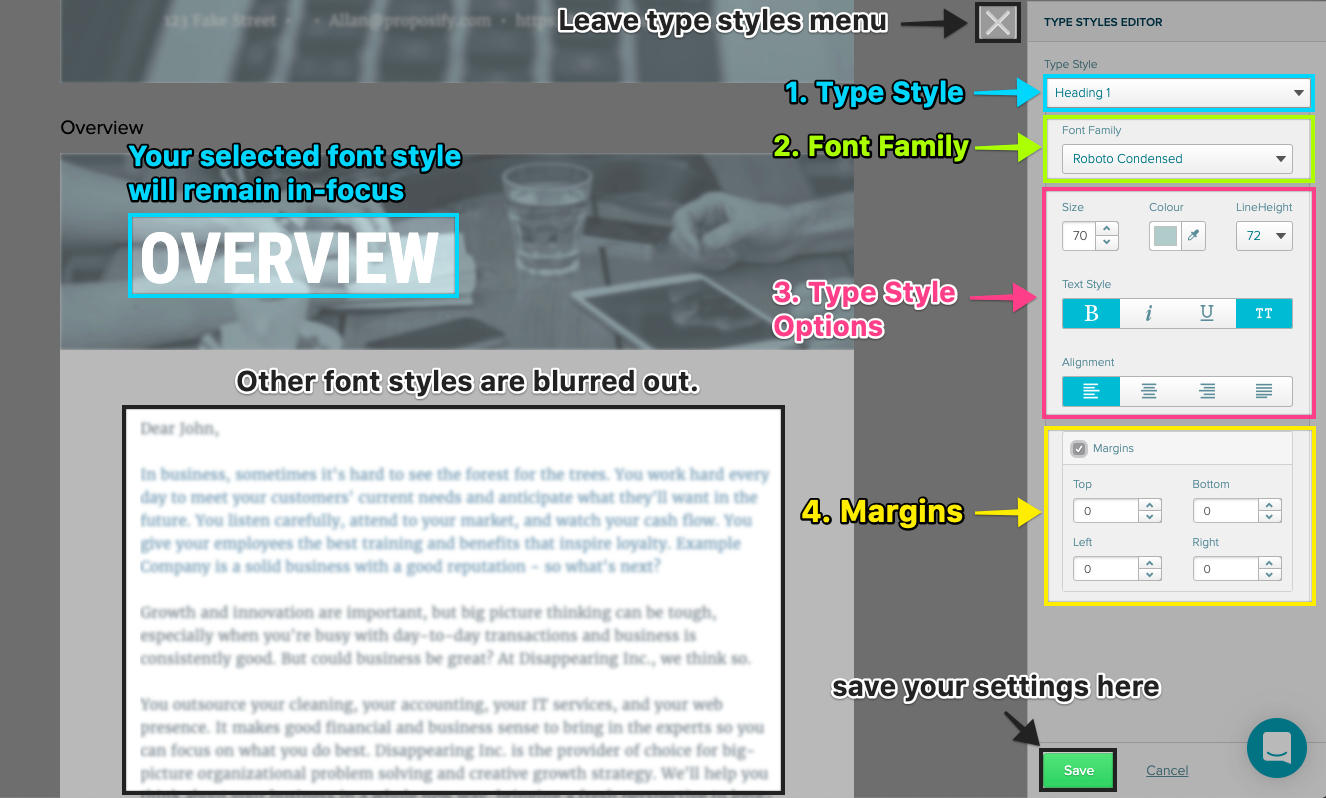
| 1 | Type Style | Choose the type style you’re looking to change. If, for example, you want to change the colour of your table footer text, you would select "table footer" from this menu. |
| 2 | Font Family | Select a font from the Google Fonts Library. to add fonts from the font library to your proposals. |
| 3 | Type Style Options | Sets the font size, line height, font colour, styling options, and alignment. |
| 4 | Margins | Specifically for Page Flow textboxes. This sets the distance between the edge of the page and the edge of the embedded textbox, measured in pixels. |
TIP: Looking to change things as you see them? You can also click the font style from the preview pane to select the font style you’d like to change.
Once you've made your changes, select Save at the bottom of the menu to keep your changes.
Table Styles

| 1 | Table Styles | Select this tab to open the Table Styles menu |
| 2 | Location | Choose where in the table you would like to make edits. |
| 3 | Font Style | Select from the dropdown what paragraph style you would like to use. You can edit these settings under the Type Styles tab. |
| 4 | Row Colour | Opens the colour picker to select a background colour for this row. |
| 5 | Borders | Enables a border and sets the border colour. Can be horizontal and vertical. |
| 6 | Padding | Sets the padding (in pixels) between the border of the table and the text within. |
| 7 | Alternate Rows | Available for Body rows only, this sets a different colour and border for every second row. |
Page Layout

| 1 | Page Tab | Select this tab to navigate to the Page Layout menu. |
| 2 | Page Size | Choose between three page sizes. It defaults to A4 format, but can be changed. |
| 3 | Orientation | Sets your page layout between portrait and landscape. |
| 4 | Margins | Sets the distance between your Page Flow textboxes and the edge of the page. |
HEADS UP: Changing the page size or orientation will not relocate the elements on the page. It’s best to do this first before you have to rearrange everything.